Introduction
Follow this guide to replace the headband hinge in the left ear cup of your AirPods Max headset.
If the left ear cup's hinge is loose or rattling, you may need to replace it.
What you need
-
-
Unplug and remove all cables and accessories.
-
To help stabilize the ear cups and prevent scratching them, consider placing your AirPods Max on a soft, clean cloth.
-
-
-
Insert a SIM eject tool, bit, or a small, straightened paperclip into the hole on the top edge of the right ear cup (labeled L).
-
Push down with your tool and pull the headband connector straight out of its socket.
-
-
-
Set the left ear cup down on a soft, clean cloth to prevent scratches and help stabilize the cup during your repair.
-
-
-
Use a P5 pentalobe screwdriver to turn (not remove) the four speaker housing screws to the unlocked position:
-
Turn the top left and bottom right screws counterclockwise.
-
Turn the top right and bottom left screws clockwise.
-
-
Tool used on this step:iOpener€12.95
-
Option 1: Apply a few drops of high-concentration isopropyl alcohol (>90%) in the gap around the perimeter of the speaker housing. Wait one minute to allow the alcohol to soften the adhesive.
-
Option 2: Heat the speaker housing with an iOpener or hair dryer. Focus the heat around the perimeter, applying small amounts for short periods of time.
-
-
Tool used on this step:iSesamo Opening Tool€9.95
-
Insert the flat side of your opening tool into the gap between the right side of the speaker housing and the lip of the ear cup (opposite the L marking).
-
Pry up the speaker housing until you can grip it with your fingers, applying constant pressure to allow the adhesive to separate.
-
-
Tool used on this step:FixMat€36.95
-
Remove the four screws securing the cable cover:
-
One 7.5 mm‑long Torx Plus 3IP screw
-
Three 1.7 mm‑long Torx Plus 1IP screws
-
-
-
Use a spudger to pry up and disconnect the speaker housing press connector.
-
-
-
Use a Torx Plus 3IP screwdriver to remove three speaker driver screws:
-
Two 6.0 mm‑long screws
-
One 6.0 mm‑long screw that's slightly thicker than the other two
-
Remove the 5.1 mm‑long standoff screw using one of the two methods below:
-
Option 1: Stick a small flathead screwdriver into one of the four notches on top of the screw and use it to slowly turn the screw.
-
Option 2: Use a Torq-Set 6 screwdriver to remove the screw, applying constant downward force to avoid damaging the screw.
-
-
-
Lift the right edge of the speaker and remove it, being careful not to touch the diaphragm.
-
-
-
Remove the two Bluetooth board connector cover screws:
-
One 7.5 mm‑long Torx Plus 3IP screw
-
One 1.7 mm‑long Torx Plus 1IP screw
-
-
-
Use a spudger to pry up and disconnect the press connector from under the cover you just removed.
-
-
-
Slide one arm of your angled tweezers under the metal neck of the coaxial connector (next to the one from the previous step) and lift straight up to disconnect it.
-
-
-
-
Use a Torx Plus 1IP screwdriver to remove the 3.0 mm‑long screw securing the Bluetooth board.
-
-
-
Stick the point of a spudger into the baord's screw hole near the hinge and pull the board towards the center of the ear cup.
-
Use your fingers to flip the board over the side so you can access the remaining connector.
-
-
-
Use the point of a spudger to press on alternating sides of the sliding connector tabs to "walk" it out of the socket.
-
-
-
Use a Torx Plus 1IP screwdriver to remove the two 1.7 mm‑long screws securing the connector cover.
-
-
-
The other end of the cover is plastic-riveted into place. Unless you're comfortable soldering off the rivets, this requires you to bend the cover.
-
Use your finger to lift and bend the cover enough that you can access the smaller connector near the back of the cover.
-
-
-
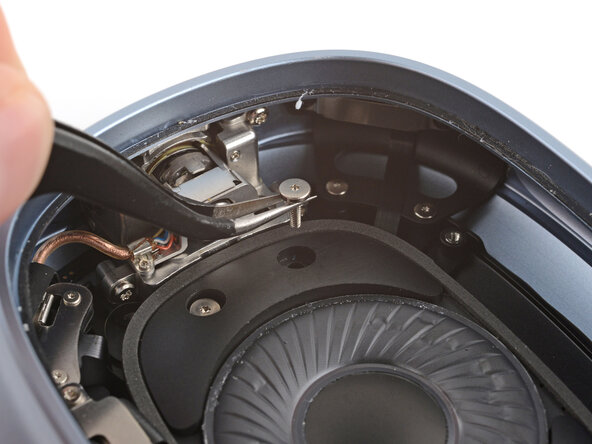
Use a Torx Plus 5IP screwdriver to remove the four 5.3 mm‑long screws securing the hinge.
-
-
-
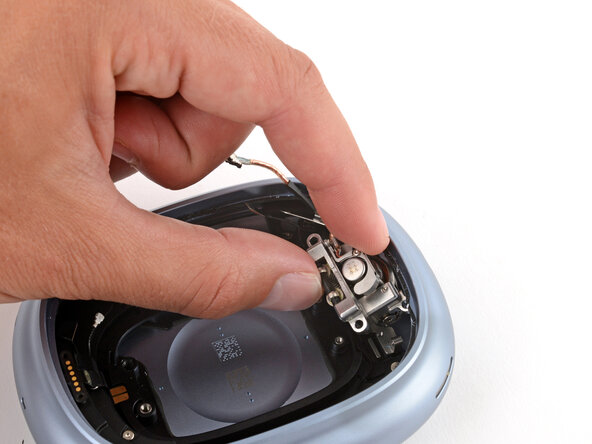
Tilt the bottom edge of the hinge upwards to free and remove the hinge.
-
-
-
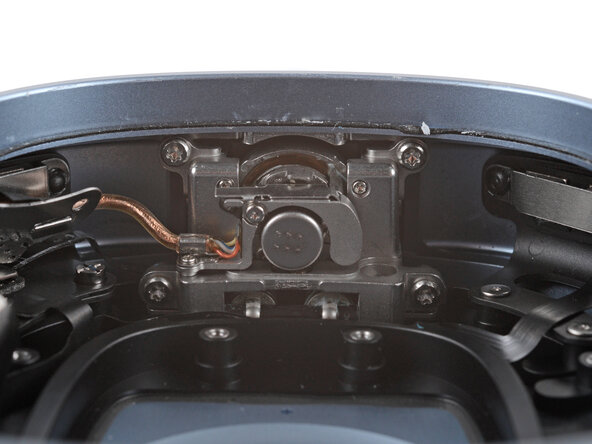
The black ribbon cable coming out of the left side of the hinge needs to be routed behind the lower screw post. Otherwise, it will likely tear. You may need to use tweezers to do this while you put the hinge in place.
-
There's a long ribbon cable that needs to run in front of the hinge. Make sure it doesn't get stuck under the hinge, or it may get damaged.
-
-
-
Insert the hinge into its recess at a slight downward angle and then rotate it into place, making sure all four screw holes line up.
-
Before moving on, go back to the previous step and make sure the cables are in their proper locations.
-
-
-
Use a Torx Plus 5IP screwdriver to remove the four 5.3 mm‑long screws securing the hinge.
-
-
-
Use a spudger to press down and reconnect the hinge press connector.
-
-
-
Use your finger to bend the connector cover back into place.
-
-
-
Use a Torx Plus 1IP screwdriver to install the two 1.7 mm‑long screws securing the connector cover.
-
-
-
Use the point of a spudger to push on alternating sides of the copper cable's connector until it slides fully into the socket on the underside of the power board.
-
-
-
Slide the Bluetooth board into its recess, making sure none of the cables that connect to it get trapped underneath.
-
-
-
Use a Torx Plus 1IP screwdriver to install the 3.0 mm‑long screw securing the Bluetooth board.
-
-
-
Use your finger to press down and connect the press connector on the board (nearest the hinge).
-
-
-
Gently lay the speaker driver into place, making sure the side with gold connector pins lines up with the contacts in the shell.
-
-
-
Use a Torx Plus 3IP screwdriver to install three speaker driver screws:
-
One 6.0 mm‑long screw that's slightly thicker than the other two
-
Two 6.0 mm‑long screws
-
Install the 5.1 mm‑long standoff screw using a small flathead or Torq-Set 6 screwdriver.
-
-
-
Use tweezers and scissors to remove any sections of bunched-up or overlapping adhesive that would prevent the housing from sitting perfectly flat.
-
Apply thin, double-sided adhesive where you removed the original, using short sections to help match the curve of the lip.
-
-
-
Hold the speaker housing up and use your finger to press down and reconnect its press connector.
-
-
-
Slide the tab on the connector cover into its slot and lay the cover down.
-
-
-
If you installed replacement adhesive, remove any liners to expose the adhesive.
-
Flip the speaker housing into the cup and press it into place around the perimeter.
-
-
-
Use a P5 pentalobe screwdriver to turn the four speaker housing screws to the locked position:
-
Turn the top left and bottom right screws clockwise.
-
Turn the top right and bottom left screws counterclockwise.
-
-
-
Hold the ear cup steady with one hand, and use your free hand to firmly push the headband connector into its slot, twisting it slightly—it should click into place.
-


Congratulations on completing your repair!
Take your e-waste to an R2 or e-Stewards certified recycler.
Repair didn’t go as planned? Try some basic troubleshooting, or ask our Answers community for help.
